
Lo que conviene saber sobre el mundo de Squarespace.
Para diseñadores, desarrolladores y personas que crean negocios en torno a Squarespace.

How to Become a Pinterest Verified Merchant with Squarespace
Pinterest’s Verified Merchant Program (VMP) is a way to recognize trusted businesses, giving them a special badge and increased visibility.
This guide walks you through the requirements and steps to apply as a Squarespace store.
Eligibility Requirements
Before you begin the application, ensure you meet the following:
Pinterest Account: Your account must be a minimum of three months old.
Website: Your business website must be claimed (see below) on Pinterest and at least 13 months old.
Profile: Your Pinterest profile must have a profile picture and completed "About" section.
Merchant Guidelines: Your products and website must adhere to Pinterest's Merchant Guidelines.

Preliminary Steps
Before you can apply for the Verified Merchant Program, you need to complete a few preliminary steps. These steps are necessary to set up your Pinterest business account and verify your website.
Step 1: Convert Personal Pinterest Account to a Business Account

Click the drop-down arrow in the upper right corner of Pinterest.
Select Settings.
Select Account Settings.
Scroll down to Account Changes.
Select Convert Account.
Double-check that the email address is the one associated with your Pinterest personal account.
Click Continue.
Step 2: Verify your Website with Pinterest

Log in to your Pinterest business account.
Click the directional chevron down icon in the top-right corner to open your menu.
Select Settings.
Click Claimed accounts from the left-side navigation.
Click Claim next to Websites.
Click the text in the box below Add HTML tag to copy it.
Click Continue.
In a separate window, log in to your website.
Go to pages > Website Tools > Code Injection > Header and Paste the HTML Tag.
Return to Pinterest and enter your website URL in the text box.
Click Verify.
Now that you've completed the preliminary steps, you're ready to begin the application process. These steps involve connecting your product catalog, setting up conversion tracking, and ensuring that your tracking system sends the necessary data.
Become a Verified Merchant

Step 1: Connect Catalog
Connecting your product catalog to Pinterest is essential for creating Product Pins, which display important information about your products, such as price and availability. Here's how to connect your catalog:
Export your products from Squarespace.
Upload the CSV Below
Upload the CSV file you exported from Squarespace
Enter your domain (e.g., https://yourdomain.com).
Enter the country currency (e.g., USD).
Enter the appropriate Google Product Category for your products (you can find it here).
Go to Pinterest and upload your data source manually:
Log in to your Pinterest business account from your desktop.
Click the hamburger icon at the top-left of the page.
Under Business, click Catalogs and product groups.
Click Add data source.
Click the Upload manually tab.
Fill in the details for your data source (name, country/region, language, default currency).
Click Choose a file to select your data source from your desktop, or drag and drop your data source into the box.
Click Upload data source.
Step 2: Set Up Conversion Tracking
Choose one of these methods to track customer actions on your website. Option 1. Manual pinterest tagging or Option 2. Google Tag Manager.
Option 1: Pinterest Tag
Add the following code to the sitewide code injection:
The base code is required for conversion tracking. Change the part of the code below that says CHANGE-ME to your unique tag ID ID which can be found here:
It's generated in the Conversion Tag Manager (link requires login), and it contains your unique tag ID.

Go to Pages > Website tools > Code Injection > Header.
EXAMPLE BASE CODE

<!-- Pinterest Tag -->
<script>
!function(e){if(!window.pintrk){window.pintrk = function () {
window.pintrk.queue.push(Array.prototype.slice.call(arguments))};var
  n=window.pintrk;n.queue=[],n.version="3.0";var
  t=document.createElement("script");t.async=!0,t.src=e;var
  r=document.getElementsByTagName("script")[0];
  r.parentNode.insertBefore(t,r)}}("https://s.pinimg.com/ct/core.js");
pintrk('load', 'CHANGE-ME', {em: '{customerEmailAddress}'});
pintrk('page');
pintrk('track', 'pagevisit');

</script>
<noscript>
<img height="1" width="1" style="display:none;" alt=""
  src="https://ct.pinterest.com/v3/?event=init&tid=CHANGE-ME&pd[em]=<hashed_email_address>&noscript=1" />
</noscript>
<!-- end Pinterest Tag -->
Add the checkout code to the code injection order confirmation/status page:
<script>
pintrk('track', 'checkout',{
value: {orderGrandTotal},
order_quantity:1,
currency: 'USD'
});
</script>

<noscript>
<img height="1" width="1" style="display:none;" alt=""
src="https://ct.pinterest.com/v3/?tid=CHANGE-ME&event=checkout&noscript=1"/>
</noscript>
Add the "Add to Cart" event code to your shop page advanced code injection:
<!-- Pinterest Pixel - Tracking clicks on Buttons -->
<script>
  function ptTrackingClicks() {
    // Add to Cart
    var cartButton = document.querySelector('.sqs-add-to-cart-button');
    if (cartButton) {
      cartButton.addEventListener('click', function() {
        var productVariants = document.querySelector('.product-variants');
        if (productVariants) {
          var variantsData = productVariants.getAttribute('data-variants');
          if (variantsData) {
            var variants = JSON.parse(variantsData);
            if (variants && variants.length > 0) {
              var sku = variants[0].sku; // Assuming the SKU is associated with the first variant
              if (sku) {
                pintrk('track', 'AddToCart', {
                  product_id: sku // Use the SKU as the product ID
                });
              }
            }
          }
        }
      }, false);
    }
  }

  document.addEventListener('DOMContentLoaded', ptTrackingClicks);
</script>
<!-- end Pinterest Pixel - Tracking clicks on Buttons -->
Option 2: Google Tag Manager (Pending)
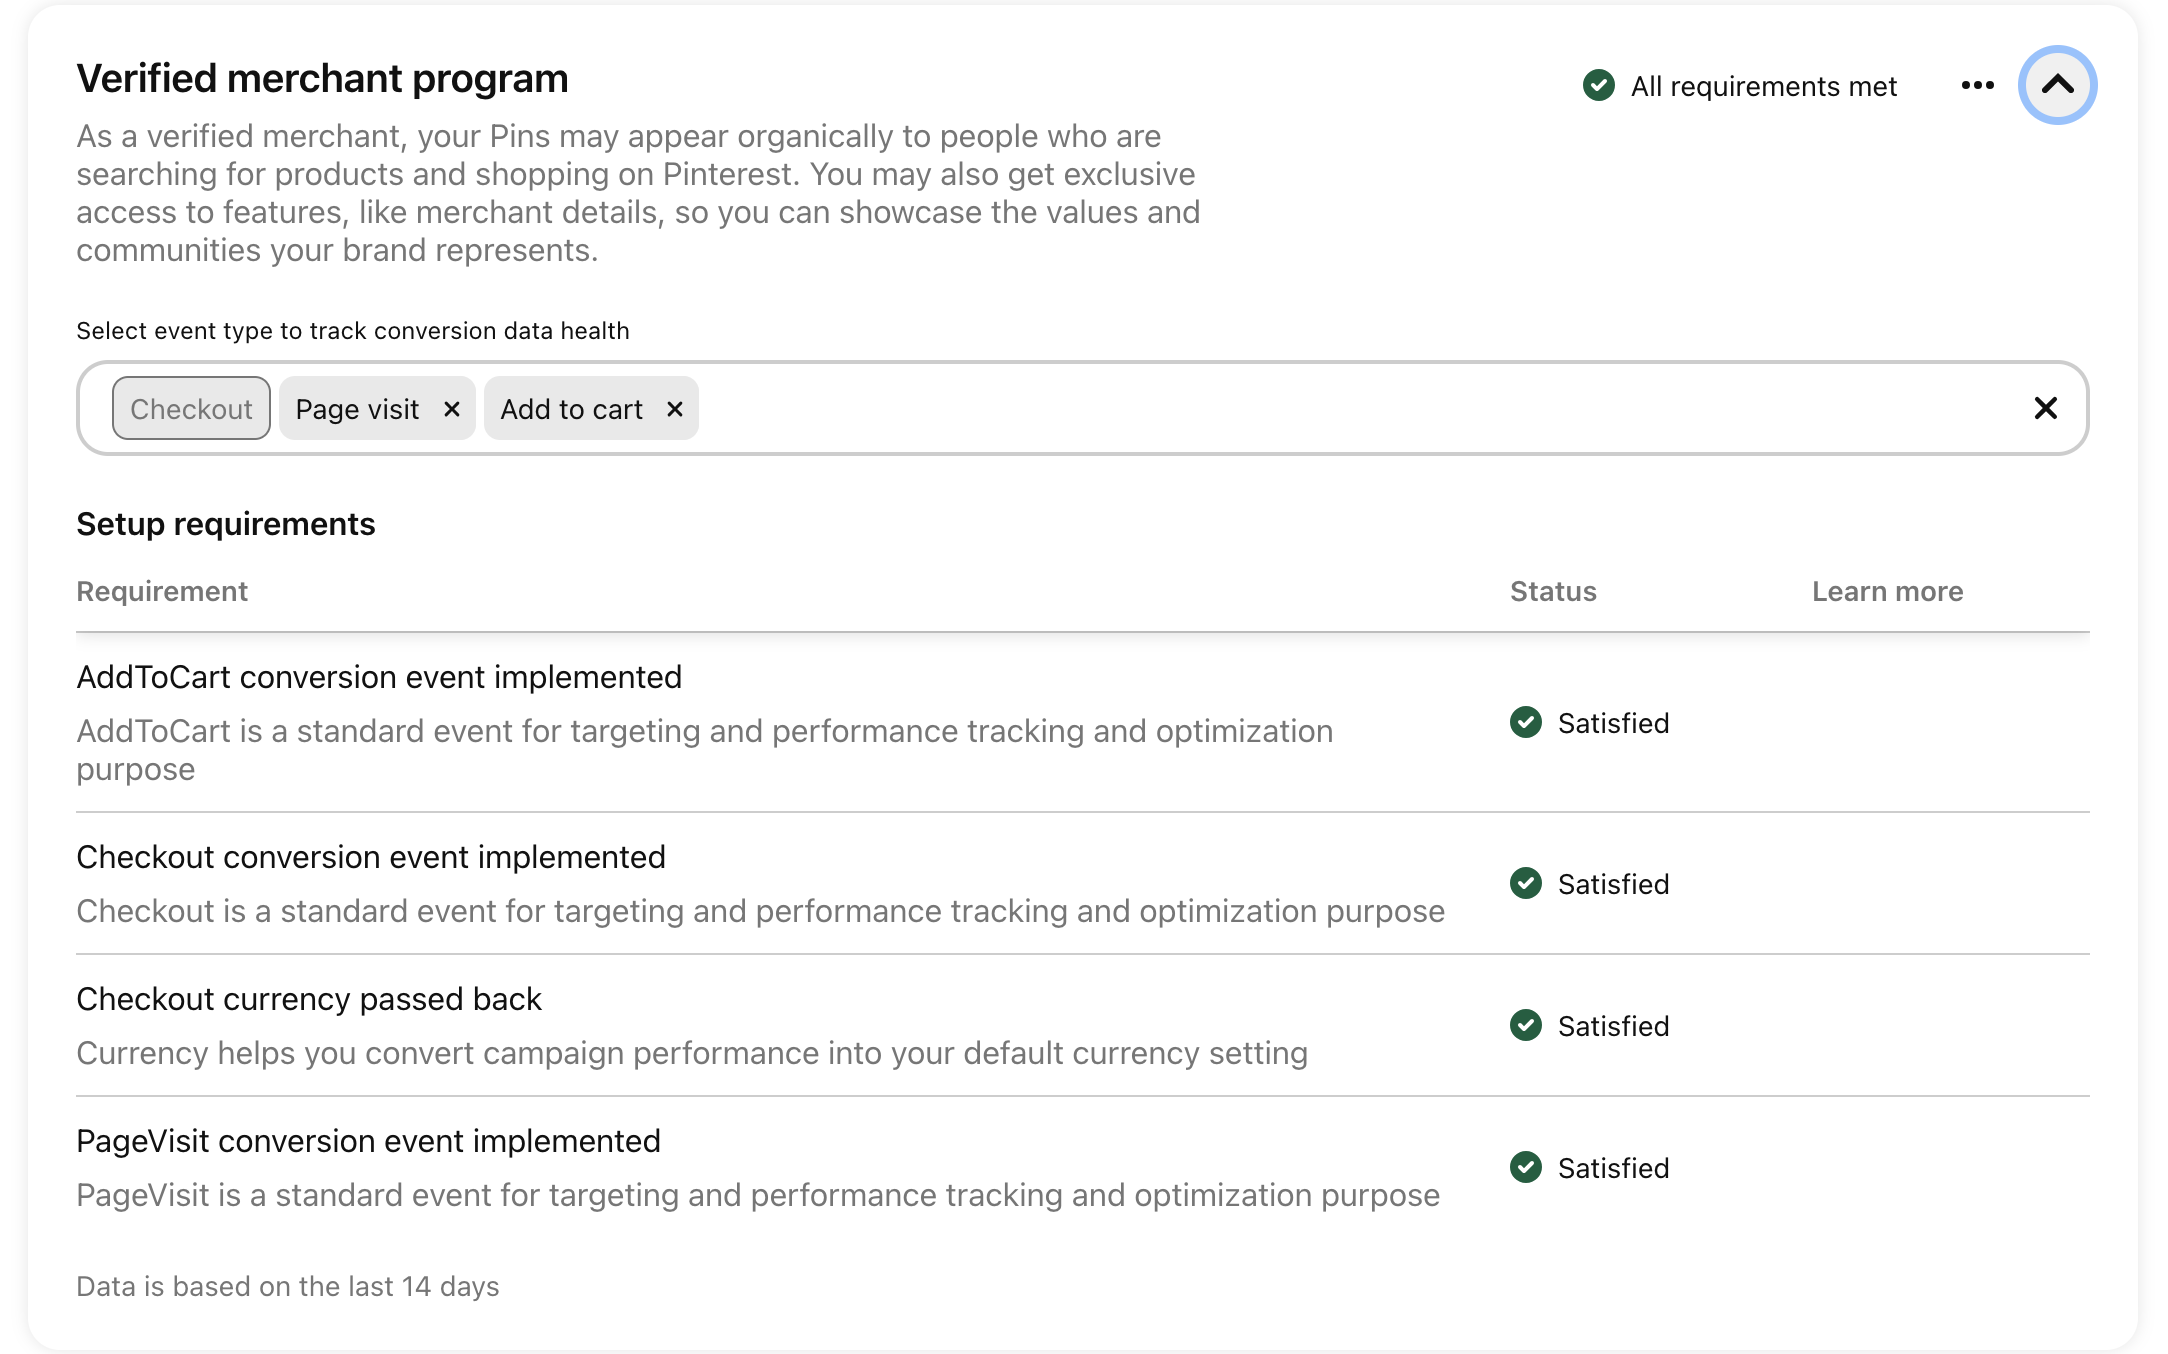
Step 3: Ensure Conversion Data
Within the last 30 days, your tracking system must have sent the following events (with checkout events including currency):
At least one 'Page Visit'
At least one 'Add to Cart'
At least one 'Checkout'
To make sure this happens, create a dummy order by creating a 100% off discount code and buying something from your shop.
In Pinterest go to Conversions > Events Overview to make sure it registered.
Take a look at an overview of event activity on your website.
Important Notes
If you don't meet the eligibility requirements, you won't be able to join the VMP.
Pinterest reviews your products and website after you upload your catalog. You'll be notified if you don't comply with the Merchant Guidelines, and you have the option to appeal the decision.
How to Apply Directly
Use this link to directly apply for the Verified Merchant Program: Apply to the Verified Merchant Program
Give it a day and check for any errors

Congrats, you’ve done it!

Need More Help?

5 pequeños detalles que ayudan a que un nuevo negocio online prospere

Image credit: Wallpaper Flare
Starting an online business is easily positioned as a great option for today’s entrepreneurs. It’s significantly cheaper than setting up physical premises, requires no expertise or qualifications, and can be done from anywhere with internet access — meaning, for instance, that someone disillusioned with conventional employment in the midst of a pandemic can try self-employment.
The low barrier to entry isn’t solely positive for any given entrepreneur, though. Yes, it makes it much easier for them to start a business, but it also makes it easier for everyone else, leading to an online marketplace that’s remarkably competitive. Once a business becomes established, it can do very well, but many never survive the startup phase because it’s so hard to stand out.
You need to cover all the essentials, naturally: have a good business model, target the right audience, get your pricing right, etc. But that only gives you a chance to cover your costs. If you want to flourish, you’ll need to find ways to outperform your competitors, and it’s ultimately the little touches that make all the difference. Here are five touches that you should focus on:
Styling tweaks
Every business site needs to look good, and the great thing about modern web development is that template-based theming makes this relatively easy. Simply choosing the right theme while putting your website together can do most of the work for you, ensuring that every part of your website’s structure looks professional regardless of the device used to access it.
That said, you mustn’t stop there. Themes — great themes, at least — are designed to be broadly customizable, allowing you to make significant changes to everything from the ordering of the panels to the color scheme in use. Given that there will inevitably be other sites out there using the same theme you’re using, it’s vital that you make some key tweaks.
You don’t need to go overboard by changing every single setting. Instead, consider your site relative to its competitors once you’re satisfied with how it looks. If it stands out sufficiently well, you needn’t make further changes, since that’s the entire point of making those tweaks.
Packaging inserts
Much is said in business about “going the extra mile” — doing what’s expected of a competent and reliable company, then doing slightly more just to show that you care about providing an exceptional service. One of the best ways to go the extra mile is to throw some minor extras into your product packaging (without notifying the recipient beforehand).
Some online sellers put in small bags of candy, for example, or discount coupons to be used for further orders (or even purchases through other sites, arranged through brand collaboration). Others throw in basic accessories (such as simple cases to go with phones), or even random products they have overstocked — it’s a good way to offload what isn’t selling.
If you find something to add, you can also take advantage of the unboxing excitement to market your business more. Throw in a business card the buyer can share with their friends when recommending your business (making business cards is something else made easier by using templates), perhaps, along with a pamphlet featuring your latest products to tempt them.
Thank-you emails
Too many online businesses view the purchase as the final step of the marketing process. You get someone interested, lure them to your site, convince them to buy, confirm the order, then move on to the next prospect: your job there is done, right? Well, it isn’t that simple. In truth, instead of always moving on, it’s better to focus on making that purchase memorable.
If you can do that, you can earn that customer’s loyalty, and customer loyalty is essential: one loyal customer is more valuable than numerous one-off buyers: they’ll spend large sums with you, be more accommodating of any mistakes you make, and drive most (or all) of your referrals. Something small that matters more than you might think is the basic thank-you email.
A well-written thank-you email leaves the buyer with a positive view of your store, however perfunctory their buying experience may have been (not every online order is exciting: they could have bought some toilet-cleaning equipment).
Authentic copy
Now, you might wonder why authentic copywriting is something I consider a small touch: well, the truth is that most website copy is always going to be similar because it needs to be functional. As much as you might like the idea of having unique product categories, what matters is making your site easy for users to navigate — and they’ll want familiarity.
In some places, though, you have the chance to let your personality shine through. Take your homepage and your “About Us” company page as the primary examples of viable areas to express some informality (if that’s reflective of your personality, of course). Instead of running with generic statements or comical braggadocio, write something unique. People like to support companies that aren’t afraid to be radically different from others.
Thoughtful visuals
I use the word “thoughtful” here because it isn’t enough to say “high-quality”: yes, you need to use images that are clear and high-resolution, but that won’t help very much if you fill every corner of your site with bland stock images. We’ve all seen sites that just wheel out generic smiling faces and scenic vistas, and it’s always boring. You should do better.
One way to manage this easily is to use photos of the team behind your business. If you’re not comfortable with that, take your own photos of things relevant to what you do: your products, your office, the area (or areas) you work in. You can also design some interesting graphics to use for panel backgrounds and even your hero image if you deem it useful.
You could create a website with a 100%-unchanged theme, leave your packaging as it is, send nothing but a confirmation email following each order, and pack your site with generic copy and visuals — and it would look passable. But that isn’t enough. You need to stand out, and that means getting the little touches right.
Cómo entender los ajustes de diseño del blog de Squarespace
Squarespace se diseñó para dar prioridad a la facilidad de uso frente a la flexibilidad total en el diseño. Esto es especialmente cierto en el caso de las plantillas de blog. Para garantizar la coherencia y una experiencia de usuario sencilla, limitan el alcance de los cambios estructurales que se pueden realizar sin tener que modificar el código en profundidad.
Lo que puedes y no puedes hacer fácilmente
PUEDES:
Elige la plantilla inicial más adecuada para reducir al mínimo las necesidades de personalización.
Utiliza los ajustes de las plantillas integradas para ajustar los formatos de fecha, activar o desactivar la visualización de categorías, controlar la longitud de los extractos y configurar los estilos de las imágenes.
Utiliza CSS personalizado para cambiar los colores, las fuentes y determinados espacios o estilos de los elementos. Esto ofrece cierta flexibilidad, pero tiene sus limitaciones.
Es PROBABLE QUE NO PUEDAS (sin conocimientos avanzados de programación):
Modifica radicalmente la posición de elementos fundamentales, como la fecha de publicación de las entradas del blog o las categorías. Estas posiciones suelen estar codificadas de forma fija en el código HTML de la propia plantilla.
Cómo personalizar la plantilla de tu blog de Squarespace
Cambios menores: Utiliza las opciones disponibles en el editor de plantillas para realizar ajustes básicos en:
Fuentes
Colores
Colocación de imágenes
Espaciado
Cambios avanzados (código personalizado):
CSS:
Selecciona elementos HTML específicos utilizando sus clases e identificadores.
Cambia la posición de elementos como la fecha modificando propiedades como
puesto,margen, yrelleno.Cambia el aspecto general con estilos de fuente, colores, etc.
JavaScript (casos de uso limitados):
Añadir comportamiento dinámico (por ejemplo, mostrar u ocultar elementos al interactuar con ellos).
Ten cuidado, ya que JavaScript puede interferir con las funciones básicas de Squarespace.
Consideraciones importantes
Versiones de Squarespace: Las opciones de personalización pueden variar entre Squarespace 7.0 y 7.1. Asegúrate de saber qué versión tiene tu sitio web. Lee aquí para averiguar qué plantilla utiliza tu sitio web.
Inyección de código: Puedes añadir CSS y JavaScript mediante la función «Inyección de código» en la configuración de tu sitio web.
Copia de seguridad: Haz siempre una copia de seguridad de tu sitio web antes de realizar cambios importantes en el código.
Ejemplo: Cambiar la fecha (CSS)
Supongamos que la clase CSS del elemento de fecha de tu entrada del blog es .fecha-de-la-entrada-del-blog. A continuación te explicamos cómo puedes colocarlo debajo del título:
CSS
/* In Code Injection -> Advanced -> Header */
.blog-post-date {
    position: relative; /* Allows movement */
    top: 20px;          /* Distance to move down */
    left: 0;            /* Adjust if needed */
}
Soluciones alternativas y compensaciones
Inyección de código: La inyección de JavaScript y, posiblemente, algo de HTML puede permitir reposicionar elementos. Sin embargo, se trata de una técnica avanzada que requiere conocimientos de programación. Además, estas personalizaciones son propensas a dejar de funcionar con las actualizaciones de Squarespace, lo que exige un mantenimiento continuo.
«Trucos» CSS: A veces, ciertos trucos CSS permiten reposicionar elementos, pero su fiabilidad varía según las plantillas y carecen de estabilidad a largo plazo.
Plataformas alternativas: Si es imprescindible disponer de un control estructural profundo sobre la presentación del blog, plataformas como WordPress ofrecen la posibilidad de editar las plantillas por completo, aunque requieren un mayor nivel de conocimientos técnicos para su configuración y mantenimiento.
Compromiso: Es posible que tengas que adaptar tus expectativas de diseño a las limitaciones de Squarespace. Céntrate en los ajustes que se puedan realizar mediante la configuración integrada y el estilo CSS limitado.
Bloques de resumen: Aunque se pierden algunas funciones automáticas del blog, los bloques de resumen de las páginas normales de Squarespace ofrecen mayor libertad a la hora de diseñar la maquetación. Valora si esta compensación merece la pena para tus necesidades concretas.
Documentación oficial de Squarespace:
Configuración de la página del blog:. Este es el punto de partida fundamental que explica qué opciones de configuración ofrece Squarespace para personalizar el diseño y el aspecto de tu blog.
Añadir código personalizado a tu sitio web: Aquí se explica cómo insertar código en tu sitio web de Squarespace. Recuerda que es probable que los cambios importantes en el diseño del blog requieran este método.
Recursos y ejemplos de la comunidad:
Foro de Squarespace: El foro de la comunidad cuenta con muchos hilos sobre la personalización de blogs. Puedes buscar utilizando términos como «personalización de plantillas de blog» o «CSS del blog de Squarespace». Presta atención a las fechas de los hilos, ya que las actualizaciones de Squarespace pueden afectar a las soluciones más antiguas.
Blogs sobre personalización de Squarespace: Hay varios blogs especializados en la personalización del código de Squarespace que suelen tratar ajustes relacionados con los blogs. Algunos de estos recursos son:
Will Myers: https://www.will-myers.com/
Secretos de Square: https://www.squaresecrets.com/
SquareKicker: https://www.squarekicker.com/